They're small. They're fluffy. They're pretty dang adorable, but they need a place to live and they grow up fast. I'm talking about baby chicks, and my family became the owners of 10 chicks this spring. We're not on a farm, but our city did pass an ordinance that allows us to raise chickens in our yard. Since we only have 10,000 things to do on any given day, we figured 10,010 isn't much more. Thus began our adventures with chickens...........
 | With 10 fluffy new family members the crew was pretty mesmerized. I, however, was a bit more realistic with all the work that was sure to come my way. We purchased a prefabricated coop from Cal Ranch and too it home for the chicks. We were fairly sure that the box was accurate when it read it could accommodate up to 8 full grown birds. That didn't turn out to be very accurate, and the chicks quickly turned to pullets and were ready for more space. Thus began the quick planning of coop construction. We checked out several books on raising chickens from the library, read blogs, listened to podcasts, and talked to neighbors with experience in raising chickens. While they aren't super demanding, they do require a fair amount of attention and care. Part of that attention and care is ensuring that they have adequate space to snack and play. We have a 1/4 acre lot so we were able to locate plenty of space for our new friends, and we began site prep. The kids wanted these birds and claimed they were willing to do the necessary work to prepare for them, care for them once they were home, and continue to provide for them throughout their lives. |
We put that claim to the test when we began prepping the site for the coop. This required moving several tons of landscaping rock that a neighbor gave us, splitting wood to get it moved, ripping out old fence posts and the concrete with it, and doing some light "grading" to ensure our coop would be level and on a secure foundation. Both kids helped with the aforementioned work (see below). KC thought it was pretty cool to learn how to use the reciprocating saw, and after cutting the old fence post looked up, smiled, and said, "dad I guarantee none of my friends have ever done that before". Knowing the city slickers that we are (including friends in our town), I smiled back and said "I bet you're right kiddo". Once the old fence remains were removed and hauled to the dump, we opted to scree the sand/gravel below. I put little man on that task and he did a great job. We didn't run a string line, but did use a level a couple times to ensure we were close to the grade that we wanted. Both kids did very well learning how to use new tools and construction methods. My goal is that as they grow they can become more and more self-sufficient.


Enter the design! With the prep work done it was time to get going on a design. My wife and I bounced some ideas back and forth and ultimately she gave me free reign to build the coop as I saw fit. I opted to use deck blocks for support, which would keep the coop off the group and allow some air flow from the floor. Living in the desert means we get high summer temps and I wanted the chickens to be as comfortable as they could be given the climate. We laid the concrete deck blocks (3 per side), leveled them, and started construction. Originally, I thought that putting posts in and bolting in a floating frame would work. That proved to be way more work, effort, and design flaw than I'd considered. Given that the kids are cleaning the coop and doing other chores in the coop, my wife wanted the coop much lower. I decided to put the 2x4s right onto the blocks, then hang floor joist hangers, and leave it at that. This method proved to me much quicker, less of a headache, and still leaves some space for the ventilation that I wanted below the coop.
Once the frame was resting on the concrete blocks and the floor joists were in I laid down the floor. This was the main cost of the coop, as I wasn't able to find adequate salvageable materials for it. I opted for 10 foot 2x6s for the floor. I figure they'd give it a rustic look once they've been used and worn, but they'd hold up long enough that I wouldn't have to replace the floor anytime soon. I spent about $100 on the floor and framing lumber that I needed, with another $40 or so on hardware. Anyway, we laid the floor down and left some 1/8" gaps +/- for ventilation. With the floor done, we opted to install the back wall first, given that it is against the house. The back wall is the only wall that is plywood based, and this was for simplicity as I was trying to get it done as soon as I could. The plywood cost us another $45 for the two sheets we purchased. Include a roll of protective wire and a quart of opps paint and primer at the local hardware store ($7) and you're at our $200 of coop costs. The rear wall has a large rectangle cut-out for the coop to air out. We covered it with wire cloth, not chicken wire, because I learned that wire cloth will actually do a better job of keeping predators out, whereas chicken wire is designed to keep chickens in or out of an area. You can see the window in the photo below.
Once the frame was resting on the concrete blocks and the floor joists were in I laid down the floor. This was the main cost of the coop, as I wasn't able to find adequate salvageable materials for it. I opted for 10 foot 2x6s for the floor. I figure they'd give it a rustic look once they've been used and worn, but they'd hold up long enough that I wouldn't have to replace the floor anytime soon. I spent about $100 on the floor and framing lumber that I needed, with another $40 or so on hardware. Anyway, we laid the floor down and left some 1/8" gaps +/- for ventilation. With the floor done, we opted to install the back wall first, given that it is against the house. The back wall is the only wall that is plywood based, and this was for simplicity as I was trying to get it done as soon as I could. The plywood cost us another $45 for the two sheets we purchased. Include a roll of protective wire and a quart of opps paint and primer at the local hardware store ($7) and you're at our $200 of coop costs. The rear wall has a large rectangle cut-out for the coop to air out. We covered it with wire cloth, not chicken wire, because I learned that wire cloth will actually do a better job of keeping predators out, whereas chicken wire is designed to keep chickens in or out of an area. You can see the window in the photo below.
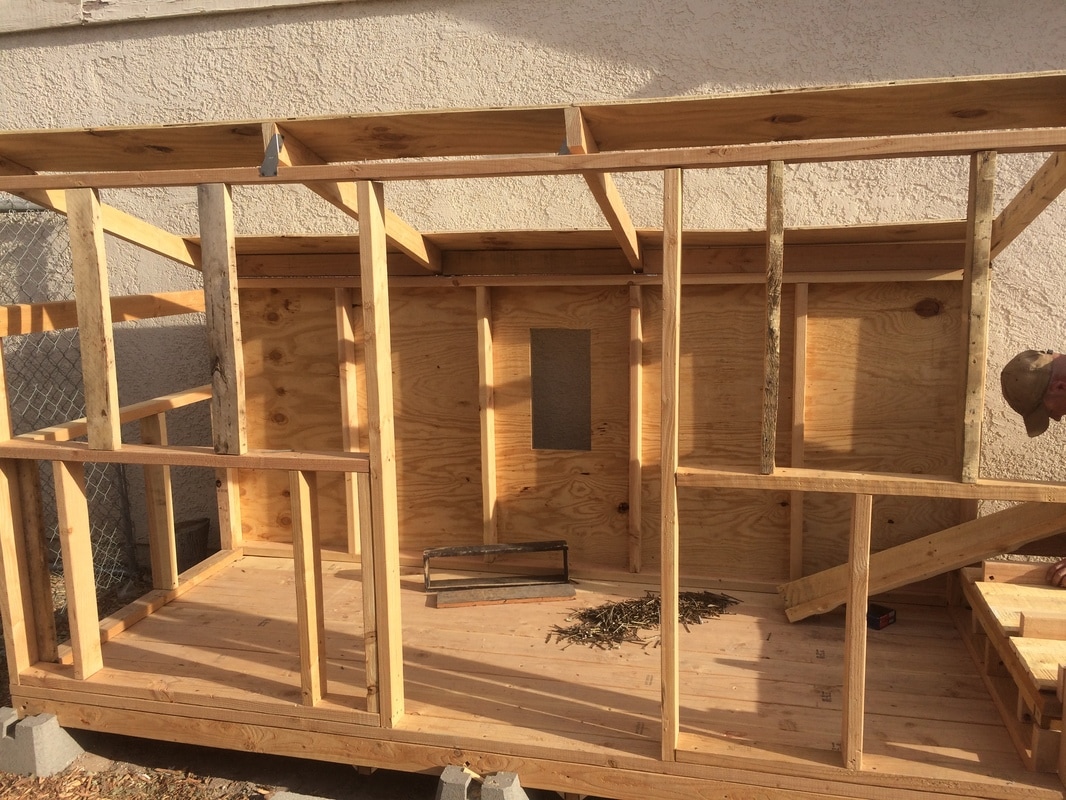
Once the back was in and braced we proceeded to frame in the other three walls. In the above photo I'm working on laying the flooring down in the nesting box. I wanted to ensure that the boxes were comfortable as I've read that hens like to be relaxed when laying. Don't know how true that is, but it was pretty easy to design and build a comfortable nesting box. I still have to slide in some plywood in between each box so the ladies have some privacy, but other than that the entire coop is done and ready to rock. The nesting boxes also had all the drafts caulked to ensure that it was plenty warm in the winter, but there is enough ventilation that they'll hopefully continue to lay during the scorching summer months. All the wood used to construct the nesting box was from pallets or salvaged from a friends scrap yard. It felt good using what I could from sources that were going to end up in the dump most likely. You'll be amazed at what people want to get rid of as long as you're willing to haul it off.
With the areas for the doors framed in I started building all the doors that this coop needed. I'd work on the coop till dark and then go into the garage and get to work on the door systems. Again, they were all made with scrap plywood and pallet wood. I was impressed with how they all turned out. I added a little flair to the doors to make them unique in their own way. The front door has a barn style to it while the other doors have a traditional x and cross bracing. Some of the fun of working with pallets was that each piece was so unique as it was that design didn't really need to be elaborate to make it look good. Conversely, there were a lot of pieces of the pallets that ended up at the dump because we simply couldn't use them due to their condition.
With the areas for the doors framed in I started building all the doors that this coop needed. I'd work on the coop till dark and then go into the garage and get to work on the door systems. Again, they were all made with scrap plywood and pallet wood. I was impressed with how they all turned out. I added a little flair to the doors to make them unique in their own way. The front door has a barn style to it while the other doors have a traditional x and cross bracing. Some of the fun of working with pallets was that each piece was so unique as it was that design didn't really need to be elaborate to make it look good. Conversely, there were a lot of pieces of the pallets that ended up at the dump because we simply couldn't use them due to their condition.

The floor and nesting box look like they've been painted, and they were. I found a $7 quart of exterior primer and paint at the local hardware store. It said it protected wood against mildew, water damage, traffic, etc. For $7 I figured it would be worth it to lay a coat or two down on the floor, and it was. I had enough that I stretched it to cover the door for the chickens to get out of and into their enclosure. The door has already been heavily exposed to the elements, not to mention plenty of chicken poop. I've rinsed it off a couple time, so I think the paint was worth the cost.
On the other side of the coop I built a door that folds down and serves as the ramp for the chickens to come in and out of the coop. I locks with a latch, but we leave it open during the summer for, you guessed it, ventilation. Next to the door is the roosting bar system. We wanted to have a poop tray under the roosting bars, so I installed on directly below the bars. The tray slides out the side door to the left of the large main front door. THis makes cleaning the coop much easier and allows us four different points to get into the coop if we have a sick bird or need to attend to the coop.
On the other side of the coop I built a door that folds down and serves as the ramp for the chickens to come in and out of the coop. I locks with a latch, but we leave it open during the summer for, you guessed it, ventilation. Next to the door is the roosting bar system. We wanted to have a poop tray under the roosting bars, so I installed on directly below the bars. The tray slides out the side door to the left of the large main front door. THis makes cleaning the coop much easier and allows us four different points to get into the coop if we have a sick bird or need to attend to the coop.
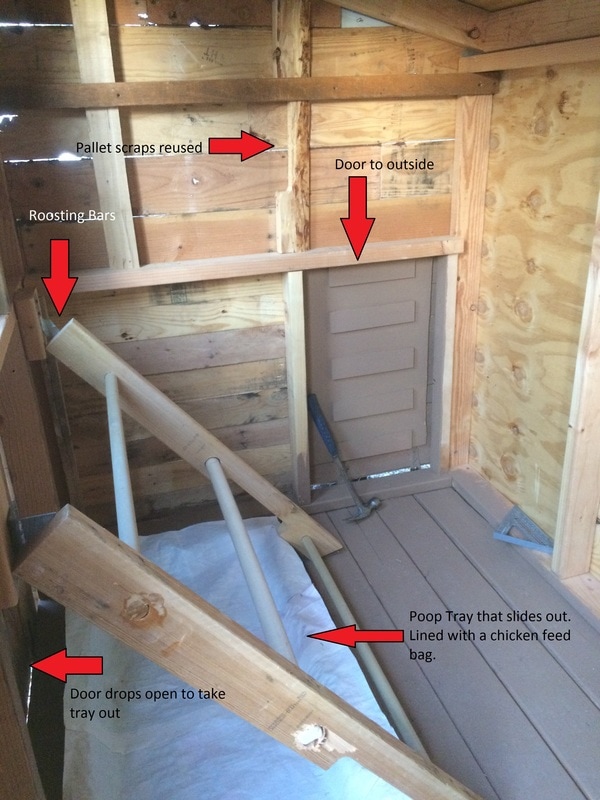
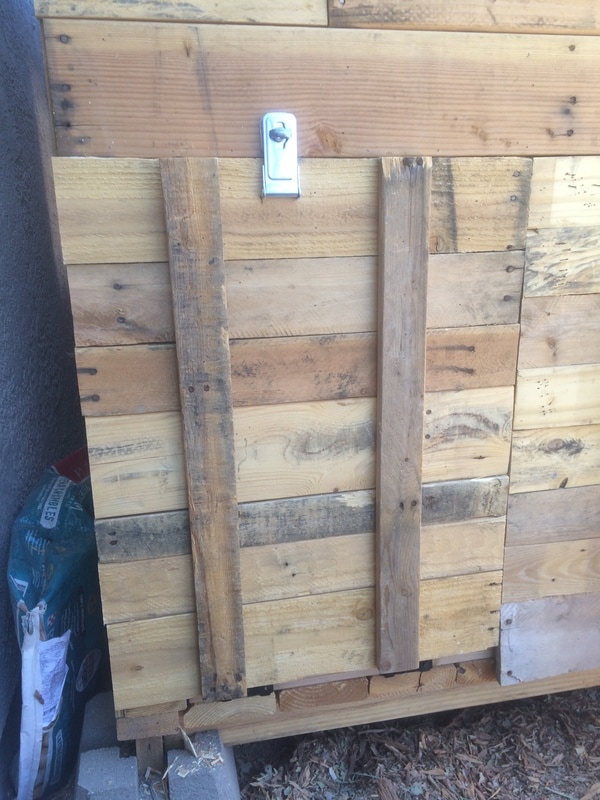 The outside of the "door to the outside". We added a lockable latch to secure it during winter months. | As you can see from above, our design actually worked out ok. Even reusing pallet pieces for the coop frame and the roosting bars worked out ok. Just above the roosting bars we have a window, and there is a window on the other side near the nesting box. My wife got glass cut at the local hardware store for about $8 per window. I used pallet wood to cut grooves for the windows to sit in. We hope that the windows will help with egg production in the winter. We figure that natural light is better than use trying to wire a light into the coop. I will still have a heat lamp for really cold nights, but those are rare in our neck of the woods. Overall the coop took us about two weeks to construct with us working after work and on weekends. Pulling apart pallets was by far the worst part of the project, with that taking a good bit of time. My wife put the reciprocating saw to good work during this project and broke down a lot of pallets. The tin roofing was free from a neighbor who tore down her patio and got rid of it. My wife would like the roof to overhang slightly, so I'm going to extend it another 12" or so with the extra materials that we have. Overall I'm very proud of the coop that we built, and at the cost. There is a feeling of pride that comes from reusing, repurposing, and recycling materials. |
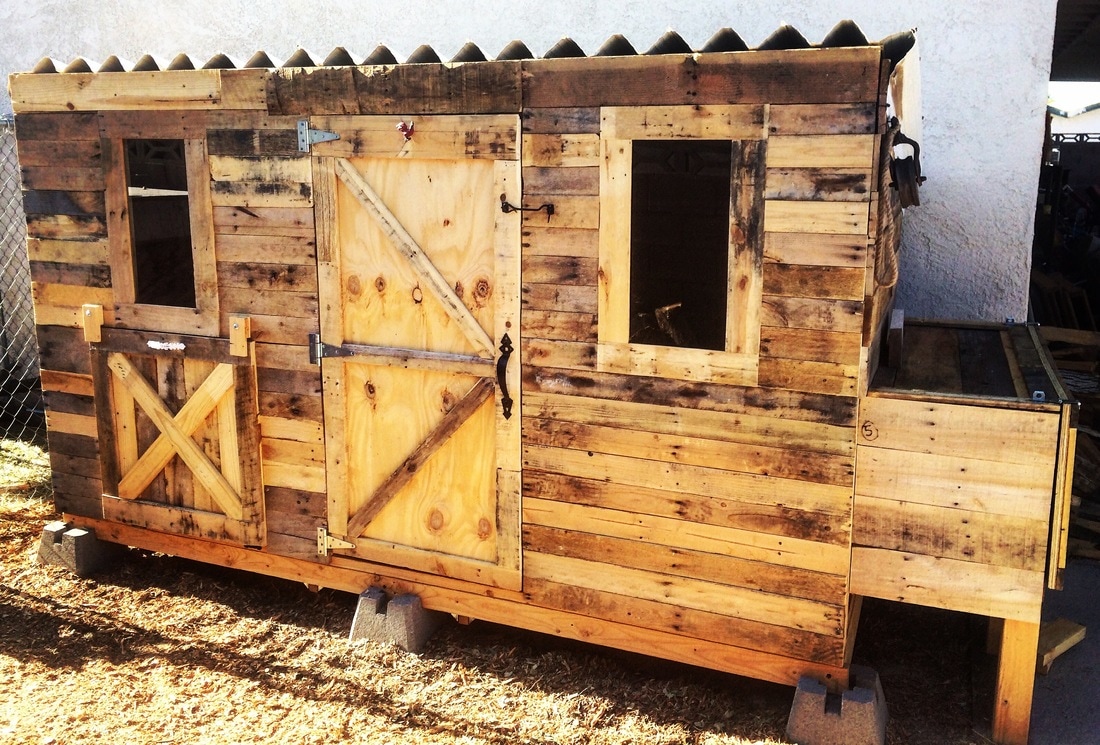
So if you're new to chickens, homesteading, backyard farming, gardening, or anything else, give a pallet coop a try. You'll need to collect plenty of pallets for the coop your size (we used 21 for a 40 square foot coop), plus any other materials you can salvage. The great thing about this method is that you can build this coop to meet your needs and budget. We could have paid for all the materials new, but why? We saved several hundred dollars by doing it this way and had a blast building it as a family (even my parents came and helped on the project a few times). If you can frame a house, or build a shed then you can certainly build your own coop. If you have questions about anything we did, please reach out to us. Check out our "farm" instagram feed for more photos of our backyard homestead @luckyBfarms.
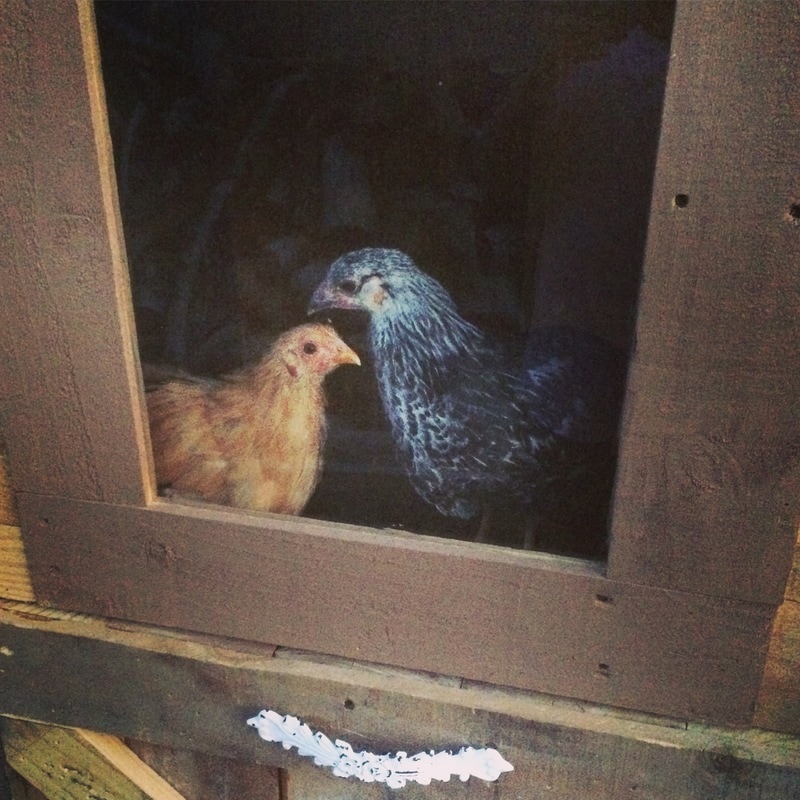
Zoe and Fiona enjoying the view from the roosting bar.
 RSS Feed
