Farmhouse decor seems to be all the rage right now. At least, that's what my Pinterest feed tells me. My wife seems to have the farmhouse bug right now, which has resulted in her wanting a new "rustic" entertainment center. I get confused with all the oxymorons that revolve around decor and styles, like shabby chic or something like a farmhouse entertainment center. All the farmhouses I've visited have tractors and chores, which leave next to no time for xbox, wii, hulu, netflix, etc. Regardless, my wife wanted a farm style entertainment center, so I went to work, well actually I went to Lowes.
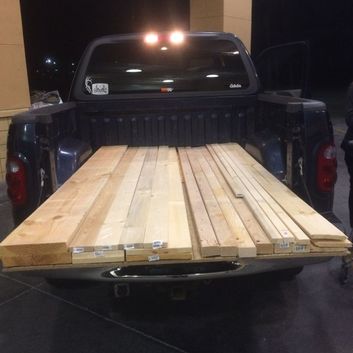 Loaded up after a couple hours at Lowes. We shorted through a lot of boards to find straight stuff! | After some quick measurements, calculations, redesign considerations, and internet research I settled on a design that seemed practical and cost-effective. I found a similar plan on Ana White's website, but I wasn't in love with some of the concepts. I took the overall look as a template and then designed my own from there, which enabled me to incorporate my own style. I also wanted an entertainment center that was shorter, so I designed one that is only 72" long. Once all the raw lumber was home I went to work making a cutting list for the pieces. I utilized 2 x 3 for the inside frame. It is light, but study, and was fairly cheap. I built two frames using my Kreg pocket jig (https://www.lowes.com/pd/Kreg-Pocket-Hole-Jig/1072743) and 2 1/2 inch pocket screws. I really wanted a quality unit, so I ensured that the top and bottom frame were perfectly equal in size, and that they were totally square. I also used wood glue and clamped them to ensure that they would be able to hold the weight of the entire unit, especially when it is moved. |

Notice the two frames on the left. These served as my top and bottom brackets.
Once the top and bottom frames were together I constructed side frames, which I thought were necessary given the weight of a TV and the unit itself. Perhaps it was overkill, but I think it made for a very sturdy end product. From there I started installing the shelving on the interior. I utilized 1x2s for shelf cleats, again because of the weight of the shelf itself, and the electronics that would go on it. I nailed these to the exterior frame of 1x3s that made the face of the unit. Now, looking back I would have paid more attention to my design and made the top and bottom rails long, solid pieces. This would have made for smooth looks on the finished product. Hindsight is 20/20, right? You can see the error of my design in the photo below. The finished product looks great, but I'd have liked to to be just a bit better.

Notice the front frame. I would make the top and bottom rails one long piece if I were to do this over.
Once the cleats and shelves were in, I went to work cutting the back panel. I found some wood grain sheeting at Lowes that my wife and I really liked. It looked rustic, and gave more character than plain plywood. We opted for that and I started cutting. The backing went on without any issues, which means that all my work was square.

With the back on, which we should have painted before installation, I began sanding the top 2x6s. Since 2x6s are used for framing, these needed some love. They were heavy from moisture, recently cut, and needed some help. I'd wanted to wait and find better ones, but with a 2 year old in tow I didn't have the patience to go to another store. Anyway, I started with 80 grit and worked my way to 220 with the top 2x6s. After two slow passes they were smooth and beautiful. My wife opted to stain them with Minwax and throw on two coats of polyurethane. You can see them drying in the top right of the photo above.
With the frame built, shelves and backing on, and the tops curing, I started to work on the doors. The doors turned out to be my favorite part of the project, and I'm very proud of my work on them. As you can see, I used plywood for the base of the doors, and then installed finish trim around them to give it a barn door look. I prefer a traditional style barn door, but my wife wanted an X. You can see who won that argument! I used 5/8" finish nails and my Bostitch brad nailer on the doors. I filled the small holes with Elmers wood filler and sanded it till they disappeared. My cuts on the 1" X pieces were very tight, as I didn't want any visible gaps. The paint also helped fill in any incredibly small spots on the doors. Now, I should have painted the plywood before adding the trim, but I like to paint afterwards to avoid any nasty gashes. I also don't like waiting for paint to dry. However, you may consider painting the doors before you opt to build them. Also, ensure your doors are EXACTLY the same size and that they are EXACTLY square.
With the frame built, shelves and backing on, and the tops curing, I started to work on the doors. The doors turned out to be my favorite part of the project, and I'm very proud of my work on them. As you can see, I used plywood for the base of the doors, and then installed finish trim around them to give it a barn door look. I prefer a traditional style barn door, but my wife wanted an X. You can see who won that argument! I used 5/8" finish nails and my Bostitch brad nailer on the doors. I filled the small holes with Elmers wood filler and sanded it till they disappeared. My cuts on the 1" X pieces were very tight, as I didn't want any visible gaps. The paint also helped fill in any incredibly small spots on the doors. Now, I should have painted the plywood before adding the trim, but I like to paint afterwards to avoid any nasty gashes. I also don't like waiting for paint to dry. However, you may consider painting the doors before you opt to build them. Also, ensure your doors are EXACTLY the same size and that they are EXACTLY square.

Once the doors were built I installed the top 2x6s via Kreg jig holes. I clamped the boards together, but should have trimmed them to be perfectly square. Another learning mistake that I've learned 5 or 6 times already, but seemingly ignore. Don't use factory cuts!! Trim them off and make the cuts square. I left a factory cut, which resulted in an end that looks out of sorts on the unit. It doesn't seem to bother anyone else, but I hate it.
Once the tops were installed I began installing the sliding barn door hardware. Now, I ordered a full kit from Amazon, but had to augment it with another set of sliders. I like the way the hardware looked when it arrived, but the instructions are horrible. If you're not super comfortable with installing hangers, steel, handrails, or other items you may not like this product. Luckily I'm comfortable with my experience and knowledge and was able to make it work without any instructions. I don't say that to gloat, but rather to let you know what to expect if you're a total beginner. This includes anyone looking for barn door hardware to install a barn door in their home.
Once the hardware was totally level and tightened up, I bolted the doors on. You can see that once the doors were added the unit really came together and looks very nice. When installing the doors ensure that they're the same distance off the table or floor, and that they butt up to one another when they meet. You don't want crooked doors or mismatched angles on them. You want the spacing to be equal all around so that it looks linear and finished. I drilled one hole for cords and we moved it into the house. Now, this thing is very heavy, and I needed help moving it around. If you have space constraints make sure it'll fit before building it!

So, before you jump on a website and see that you can build one for a couple hundred bucks, be sure to do your research. I'd recommend borrowing tools or working with a friend to construct one if you're a beginner. This project took me 10 days to build, with all my work being done after my regular job. I'm happy to build one for anyone that would like to purchase one. Please contact me for an estimate based on the size and complexity of the unit you'd like.


My safety officer ensuring that hearing protection was worn at all times.
Visit me at https://www.pinterest.com/pin/111323422019833091/ to see more of what I'm up to in my shop!
 RSS Feed

